If there’s one issue that affects all Android Jelly Bean users, more or less equally, it’s battery life. Specifically, how to extend it, without having to resort to spare batteries (if applicable) or plug-in emergency chargers (though these are, of course, a great thing to have around). Covered here are generic tips which will apply to almost all Android smartphones (though modeled here on a generic Nexus device), I look at diagnostic screens, at settings, at power saving tips, at choosing your installed applications and wallpapers with power drain in mind, and much more. Each tip may save 5%, 10% or even 20% power drain, but combine them all and you can easily double your phone’s battery life.
Yes, really.
Background
Android may be the most powerful mobile operating system in the world, it’s certainly the most popular right now and the one showing the most innovation, both in the user interface and under the hood, with Google’s resources and ambitions powering it forwards. However, we’re now seeing ever larger-screened phones (5.2”, 5.5”, 6.3”!) with ever faster processors (up to eight core, up to 2GHz, etc.) There are also ever increasing amounts of RAM (3GB in one upcoming case!) and storage memory (up to 64GB), too. All of which can only mean that far more power is needed to keep the show on the road.
Happily, there’s some good news too, in that larger batteries are starting to be fitted, too – 3000mAh cells aren’t unheard of now. Yet even with more charge inside, it’s still far too easy to run out of power before the end of a busy day, which is why a little thought needs to go into working out the biggest drains on your smartphone’s resources and managing your battery in a smart way.
Not covered in this article is the burgeoning market in add-on battery utilities, most of which work by automating the techniques used here, but I wouldn’t recommend investing in one of these (often complicated) utilities until you’ve mastered the basics!
Note that there will still be occasions when you run out of power, or when you forget to charge your phone before heading out. In this circumstances, I’d strongly recommend an external charger/battery of some kind (e.g. this one, perfect for slipping into the smallest wallet?)
A 12V-to-micro-USB adapter (e.g. here) for your car is probably a good investment too, why not leave it plugged in permanently in your vehicle and give your smartphone a little top-up every time you travel? Finally, it goes without saying that if you’re using your phone for in-car Google Navigation (or similar) then it should always be plugged into a power source.
Here are my top 10 tips that have a direct impact on battery life, hopefully without having too drastic an impact on how we use our Android smartphones. Note that the tips are demonstrated on, and in the context of, stock Android, on the Samsung Galaxy Nexus and LG Nexus 4. You may find slight differences in Settings menus and home screen layouts on smartphones from various manufacturers, but the screens and principles are much the same.
1. Turn down your screen (slightly)
Physics is king when it comes to batteries. After all, those electrons have got to go somewhere. And the two biggest ways to use these up is to radiate away heat (of which more later) and light.
It’s very important to find out what sort of display your phone has – AMOLED screens (e.g. in the Samsung Galaxy S range) work by getting each pixel to produce light directly, which is why black areas on an AMOLED display really are black, i.e. there’s no light coming from the device at all. The downside is that this technology consumes ten times as much power when showing a white-themed screen (e.g. in Gmail, Browser or Calendar) as a dark one (e.g. Settings), and there are some tips here to help out in this regard – you can save huge amounts of battery power by choosing to use wallpaper and applications that are ‘dark’-themed.
Android usually ships with a selection of dark-ish wallpapers, but if your phone has an AMOLED display then it’s worth, when there’s a choice, selecting applications which run ‘dark’. For example, the third party Twitter client ‘Plume’ has a ‘black’ theme which works very well. More and more applications are now coming with the same option.
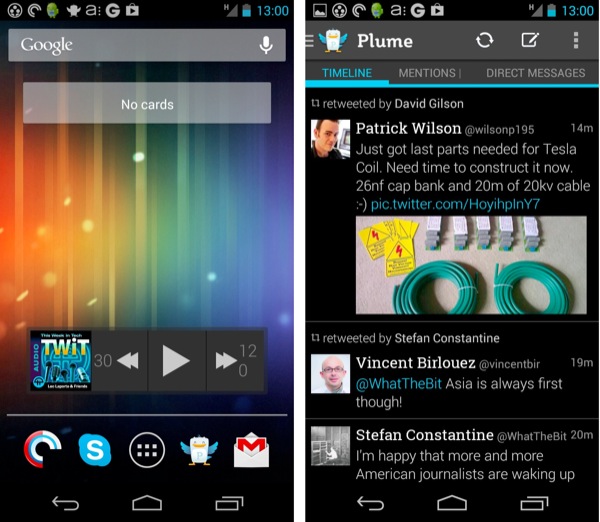
Dark wallpapers and application themes help a LOT on AMOLED-screened phones
In contrast, LCD screens (e.g. in the HTC One) still use more power for different screen colours, but the effect there is marginal. Far more important for LCD screens is the power being poured into the backlight, so how you set the screen ‘brightness’ is critical.
Similarly, brightness has a big effect on power drain in Amoled screens, at least for bright/white areas of the screen.
You’ve probably played with this already, but tap on Settings and then on ‘Display’ and then on ‘Brightness’. On most Android phones there’s the choice of either allowing ‘Automatic brightness’ or setting brightness manually using a slider. if you’re lucky, the manual brightness also takes into account ambient light levels, giving you the best of all worlds.
‘Automatic’ is well worth a try on most devices, by ticking the box – although the display will instantly look paler and less impressive, you will, I promise, be surprised how soon you get used to the ‘new level’. If your phone has no ‘Auto’ box then just take the slider down to 50% and try using the phone like this.
2. Heat: a warning sign
Having dealt with light, above, there’s the little matter of heat. When working really hard – perhaps playing a 1080p movie or downloading something meaty over a weak 3G connection or running sat-nav at full screen brightness – it’s normal for the processor in your smartphone to get quite hot. The manufacturer has designed in materials to conduct heat away into the body of the phone, so don’t worry too much. But if you find your phone’s getting very warm and there’s nothing particularly exciting going on then you’ve got a problem.
Usually the culprit is a game or application that’s gone rogue, running unchecked in the background, usually through sloppy programming or through a bug in the app’s code. See the section on terminating running applications below!
3. Find out where your battery is going
Go into Settings on your Android phone (usually on the homescreen or notification shade and/or as an application in its own right on the main apps menu) and swipe down until you see ‘Battery’. Tap this.
Sorted by the percentage of power used since the last recharge, Android gives you a complete breakdown of hardware battery hogs, plus any applications which have loaded up the phone’s processor significantly.
Somewhat vaguely, ‘Screen’ is usually top of the list and doesn’t tell you much you didn’t already know, but it’s worth scanning down the list for possible culprits if you’re having battery life problems. Wow, see that utility that was supposed to just help you now and then? What’s it doing using up 15% of your battery since the last recharge? Time to uninstall it, perhaps? Ditto that game which you ‘only played for 20 minutes’ yet which killed 35% of your charge?
Although you won’t be able to do much about most of the apps listed here, there’s usually a surprise or two which can be addressed, or at least noted.
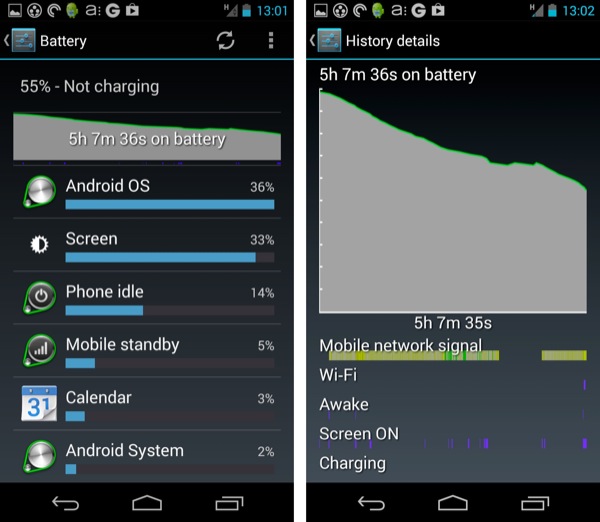
Battery usage diagnostics
4. Cellular connectivity issues
Also on the battery summary screen just mentioned, you’ll also have a nice line chart of battery charge over time – tap it to bring up a full-screen version, as shown above, complete with diagrammatic confirmation of when connectivity was active, when the screen was on, etc.
One of the hallmarks of a smartphone is its connectivity – yet this can really suck power. It’s a tricky balance, to be sure. You want your Android smartphone to be always connected, providing news and updates, email and access to the Web, yet you also want decent battery life. But the radio power needed to keep you connected can be significant, especially when dealing with 3G or 3.5G (or, now we’re in 2013, 4G) data. Things are wonderfully efficient when you’re standing near a cell tower, but spend a couple of hours, away from a city centre, on the fringe of a 3G data cell and your phone will use so much power trying to maintain the connection that your battery will be massively depleted.
Your smartphone will keep using data – it’s what it does. So we need to be able to turn 3G (and 4G) off sometimes. If you do find yourself out in the sticks and away from good coverage, remember slow old, long range 2G, assuming that your network contract still supports this. Find ‘Wireless & networks’ in Settings. Tap on ‘More’ and then on ‘Mobile networks’ and then finally tick ‘Use only 2G networks’. This forces the phone to use GPRS and EDGE for data. These ‘2G’ technologies are much slower but also less power-hungry than 3G, having a larger working range. So, when you have poor 3G signal, tick this option.
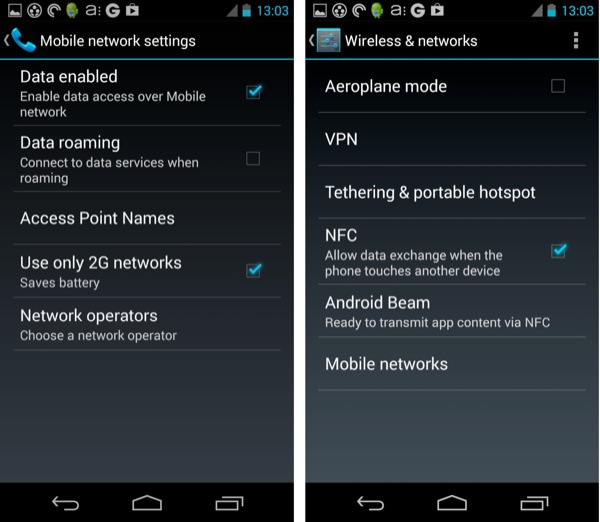
Delving into the Mobile Networks settings to turn 3G off temporarily…
Of course, having to delve this deep into Settings just to tick this one box is a bit of a pain, mind you. ‘2G-3G OnOff’, free in the Play Store, thankfully, gives a direct shortcut to this very dialog. One tap and you’re there. Well worth installing.
5. Watch out for GPS
Usually left activated accidentally after some Maps look ups or navigation, GPS is another power hog, unsurprising, as it’s receiving data from satellites in space!
However, many apps need your rough position, but cell tower location will often do. You can save power by going to Settings>Location access, and unchecking ‘GPS satellites’. That way, the GPS receiver won’t be powered up every time an app wants to know where you are. Don’t worry, if you really need GPS again (e.g. for navigation) when you’ll be prompted to turn it on.
6. Home screen power hogs
In addition to applications, also running all the time are widgets which update with data from your phone or from the Internet.
One of my biggest tips is to keep such widgets to a minimum, just install and place the ones you really want. For example, your job might need a close eye on stock prices. Fair enough, but do you really need today’s ‘hot’ cartoon or updates from LinkedIn?
Also sucking in power are live wallpapers, often supplied by default because they look ‘swishy’. These are effectively applications in their own right and are constantly sucking up processor power.
But once the novelty period is over, it’s best to stick to traditional (static) ‘wallpapers’. Long press a blank spot on any homescreen, tap on ‘Wallpapers’, then pick something suitably pretty and be happy that it’s not demanding processor time.
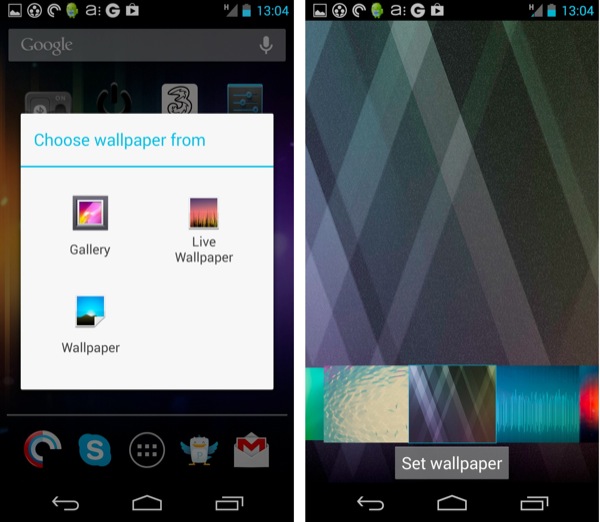
Selecting a new wallpaper – make it static (as well as AMOLED-friendly dark!)
7. Shorter timeouts
One unique facet of phones and mobile operating systems is that they get used in extraordinarily short bursts, most of the time: unlock the screen, check the time or a message, and so on. Now you may be very well trained and it’s routine for you to power down the screen manually after each brief action – it’s easy enough, after all, with modern side mounted power/unlock buttons (sorry, HTC owners, go bug the manufacturer to change its design habits!)
On the other hand, you may need a little assistance here. Head into Settings>Display and notice the ‘Sleep’ setting. This is the number of seconds the phone will wait after you stop touching it before the screen will turn off. The default is usually ’30’, but try living with ’15’ or even ’10’ – that won’t inconvenience you too much and, aggregated over fifty phone turn-ons per day, can avoid significant extra power wastage.
8. Wi-fi and Bluetooth
Wi-fi is an obvious function to turn off when you’re truly mobile, but note that this doesn’t save much power and will also slow down position lookups around towns and cities. Turning Bluetooth off can also help – a little – and you may not miss it unless you want to connect to an accessory.
9. Managing running apps
Although Android’s good at multitasking, everything that’s ‘running’ will use processor power as it updates and possibly goes online, according to its schedule. You can see what’s chugging away in the background at any time by going to Settings>Apps, just swipe right to the ‘Running’ pane.
You can stop any app or service by tapping on it and tapping on ‘Stop’, though it’s completely impractical to manage running apps from here on a day to day basis, you’d be forever checking, swiping and tapping!
Far better is to use a free utility like ‘Advanced Task Killer’ in the Play Store. Uncheck any apps you really do always want running (e.g. Gmail, Doggcatcher), to protect them – Advanced Task Killer will remember your preference here. Then, when you feel your smartphone is running a little slow and you’re aware of having run dozen apps and that they’re probably hanging around using up power, you can kill off everything non essential with one tap. There, isn’t that cleaner, faster and more efficient?
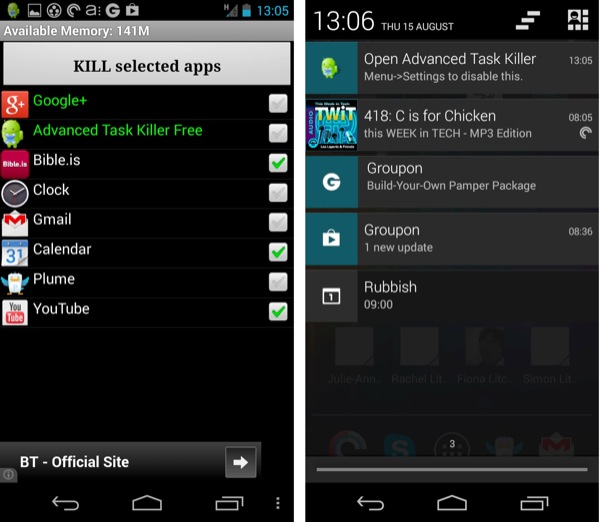
Advanced Task Killer in action. On the right, note the handy shortcut to it in your notifications shade.
10. Treat your battery well
Hopefully all the tips above will help most people. dramatically improve the battery life of their Android Jelly Bean smartphones. There’s one other big factor, mind you, and that’s how old the battery is in your phone. All Li-Ion and Lithium-Polymer rechargeable batteries do reduce in capacity over time. If treated well (not too many deep discharges), your phone’s battery will still be at about 80% capacity even after a year of hard use. If mistreated (letting it go flat often, exposing it to very high or very low temperatures), then it can be down to 50% capacity after a year. Which is why having a replaceable battery is often a factor when choosing a smartphone.


